
(This is a repost from my personal wiki-page)
This lazy-guide is a short summary about how I made my Adafruit Feather nRF52840 Express work with ANT+.
The Feather is an Arduino compatible board using the nRF52840 SoC from Nordic Semiconductor (NordicSemi).
Introduction
ANT (Adaptive Network Topology) is a wireless communication network standard intended for sensor networks. Originally developed by DynaStream, it currently belongs to Garmin. It operates in the ISM spectrum and most of its specs available publicly. Certain IPR-s remains controlled by Garmin, but for non-commerical use it can be used without a license fee.
ANT+ is a interoperability standard on top of the ANT transport standard in order to create an “ultra low-power wireless” ecosystem for fitness and medical applications. Notably, Garmin runners’ and bikers’ watches and bike-computers uses this standard to communicate with various measurement sensors.
The nRF52840 SoC is part of the nRF52 series of chips from NordicSemi. It is multi-protocol capable and a number of Arduino compatible boards sports this chipset. The most notable ones:
-
The nRF52849-DK Development Kit from NordicSemi
-
Adafruit Feather nRF52840 Express from AdaFruit Industries
-
The nRF52840 Pro Mini fromSparkFun
For legal (and probably other reasons) neither of these boards come with the ANT+ protocol stack pre-installed, albeit they are fully capable of running that stack. This guide is a summary of how I made my Adafruit nRF52840 Feather ANT+ capable while I kept its original functionality, i.e., being Arduino compatible and supporting Adafruit’s Bluefruit Bluetooth library.
The adaptation removes the Bluetooth only S140 SoftDevice from the firmware and replaces it with the S340 combined SoftDevice running BLE5 and ANT+ concurrently.
Note: The CircuitPython capability will be lost, since the stock CircuitPython interpreter for this Feather is provided as a binary UF2 firmware update is bound to the S140 Bluetooth-only softdevice.
BEWARE: trying to install the CircuitPython UF2 package to a S340-adapted Feather will brick your Feather and you will need to use a SWD programmer device to make your Feather usable again!
Credits
A number of internet resources helped me. The biggest help came as form of a personal mail from rtgree01, whom I got acquainted with by Curtis Malainey. It was him, who first managed the S340 SoftDevice to work with his Feather and he kindly shared his steps with me. This guide is based primarily on his work.
-
https://github.com/charlesportwoodii/Adafruit_nRF52_Bootloader – some interesting learnings about the bootloader
-
https://learn.sparkfun.com/tutorials/nrf52840-advanced-development-with-the-nrf5-sdk – I learnt a lot about using the nRF5 SDK and the ARM-GCC workflow
-
https://learn.sparkfun.com/tutorials/nrf52840-development-with-arduino-and-circuitpython tons of info about what does it take to add a new board-type to the Arduino IDE. This also helped a lot in understanding rtgree01’s comments about his PlatformIO adaptation.
-
The Adafruit nrf52 bootloader: https://github.com/adafruit/Adafruit_nRF52_Bootloader
-
A blog entry of a similar bootloader hack success. but with the SparkFun PRo Mini board: . https://judepereira.com/blog/nrf52840-flash-s340/
Prerequisites
Must to have
-
You will need, obviously, an Adafruit Feather nRF52840 Express
-
The original Adafruit bootloader from GitHub: https://github.com/adafruit/Adafruit_nRF52_Bootloader, and the corresponding toolchain:
-
The S340 SoftDevice realizing the BLE5 & ANT+ protocol stacks
Most likely you will need to have
-
An SWD programmer (Segger J-link), just in case if you need to “unbrick” your feather after a mistake.
Note: the nRF52840-DK from NordicSemi contains an On-Board Segger programmer (Segger-OB), which is free to use for Nordic chipsets. The Segger OB on the NordicSemi DevKit also has an SWD connector for external boards, so it can be used with the Feather, as well. Otherwise the Segger EDU can be a not-so-expensive alternative
Good to have
-
If you need the Arduino IDE support, then the Adafruit Arduino BSP: https://github.com/adafruit/Adafruit_nRF52_Arduino
-
This can be also used for the PlatformIO IDE support
Adapting the bootloader
Note: this tutorial is based on the v.6.1.1 versions of the NordicSemi softdevices and the 0.3.0 version of the Adafruit bootloader
A. Warm-up: Rebuild the Adafruit bootloader
1. Clone the Adafruit bootloader from https://github.com/adafruit/Adafruit_nRF52_Bootloader. It contains two submodules, hence you need to clone it recursively. I used to the GitHub Desktop, which does recursive cloning automagically
git clone https://github.com/adafruit/Adafruit_nRF52_Bootloader
cd Adafruit_nRF52_Bootloader
git submodule update --init --recursive
Follow its readme: https://github.com/adafruit/Adafruit_nRF52_Bootloader/blob/master/README.md
-
install the ARM-GCC toolchain, plus the GNU make, as needed. See above
-
install nRF5x command line tools, as needed. See above
-
install adafruit-nrfutil, a modified version of Nordic nrfutil, which required to perform DFU. Install python3 if it is not installed already and run this command to install adafruit-nrfutil from PyPi:
$ pip3 install --user adafruit-nrfutil
2. Make sure that you can succesfully build and flash it into your board.
Follow the instructions at https://github.com/adafruit/Adafruit_nRF52_Bootloader/blob/master/README.md. Change the serial to your actual serial device. For me, under Windows10 it was COM5. Under Linux it could be, for example, /dev/ttyACM0
$ make BOARD=feather_nrf52840_express all combinehex
$ make BOARD=feather_nrf52840_express SERIAL=COM5 dfu-flash
If you run into any trouble, then DO NOT PROCEED further down within this lazy-guide until you can successfully rebuild the original bootloader and flash it into your device!! (If you can’t build and flash the original version, then it makes no sense to try to hack it.)
B. Get the ANT SoftDevice
Download S340 SoftDevice from thisisant.com. Unpack it somewhere. You will need to rename and copy it later.
C. Modify the Adafruit bootloader
1. Adapt the Makefile
Insert the following after setting flags according to MCU_SUB_VARIANTS after line #106:
ifdef USE_S340
#if S340 then adjust SD_NAME and MCU
  SD_NAME = s340
  MCU_FLAGS = -DNRF52840_XXAA -DS340
endif
The graphical diff looks like this (left is orginal, right is modified) 
2. Insert the S340 SoftDevice headers and binary into the source tree
Go to …\lib\softdevice\. Create a dir called s340_nrf52_6.1.1:
...\lib\softdevice $ mkdir s340_nrf52_6.1.1
This directory needs to store the v6.1.1 version of the BLE+ANT combinded S340 softdevice headers + the .hex binary. The way you can get that is described here: https://www.nordicsemi.com/Software-and-tools/Software/S340-ANT
IMPORTANT:
-
you should rename the .hex file to: s340_nrf52_6.1.1_softdevice.hex
-
You should put the S340 library headers under: s340_nrf52_6.1.1_API
That is, your resulted library tree should look exactly like this:
s340_nrf52_6.1.1/
├── s340_nrf52_6.1.1_API
│   └── include
│       ├── ant_error.h
│       ├── ant_interface.h
│       ├── ant_parameters.h
│       ├── ble.h
│       ├── ble_err.h
│       ├── ble_gap.h
│       ├── ble_gatt.h
│       ├── ble_gattc.h
│       ├── ble_gatts.h
│       ├── ble_hci.h
│       ├── ble_l2cap.h
│       ├── ble_ranges.h
│       ├── ble_types.h
│       ├── nrf52
│       │   └── nrf_mbr.h
│       ├── nrf_error.h
│       ├── nrf_error_sdm.h
│       ├── nrf_error_soc.h
│       ├── nrf_nvic.h
│       ├── nrf_sd_def.h
│       ├── nrf_sdm.h
│       ├── nrf_soc.h
│       └── nrf_svc.h
└── s340_nrf52_6.1.1_softdevice.hex
3. Modify nrf_sdm.h
-
Go to …/lib/softdevice/s340_nrf52_6.1.1/s340_nrf52_6.1.1_API/include/
-
Modify ‘nrf_sdm.h’ at line #191: uncomment the ANT_LICENSE_KEY in case your use of the softdevice conforms to the Garmin licensing conditions for ANT evaluation license!. If not, then you must obtain a commercial license.
The graphical diff looks like this (left is orginal, right is modified)  replu
replu
4. Create a new board definition called ”feather_nrf52840_express_s340”
-
Go to … /src/boards/.
-
Copy the ‘feather_nrf52840_express’ dir to ‘feather_nrf52840_express_s340’
-
Go into the ‘feather_nrf52840_express_s340’ subdir, which was just freshly created by copying ‘feather_nrf52840_express’ over.
Modify src/boards/feather_nrf52840_express_s340/board.h
-
Change the #include guards from “_FEATHER_NRF52840_H” to something else, say _FEATHER_NRF52840_S340_H
-
Change the “BLEDIS_MODEL” to something else, say “Feather nRF52840 Express w.ANT”
-
Change the “UF2_PRODUCT_NAME” to something else, say ““Adafruit Feather nRF52840 Express w.ANT”
The graphical diff looks like this (left is orginal, right is modified) 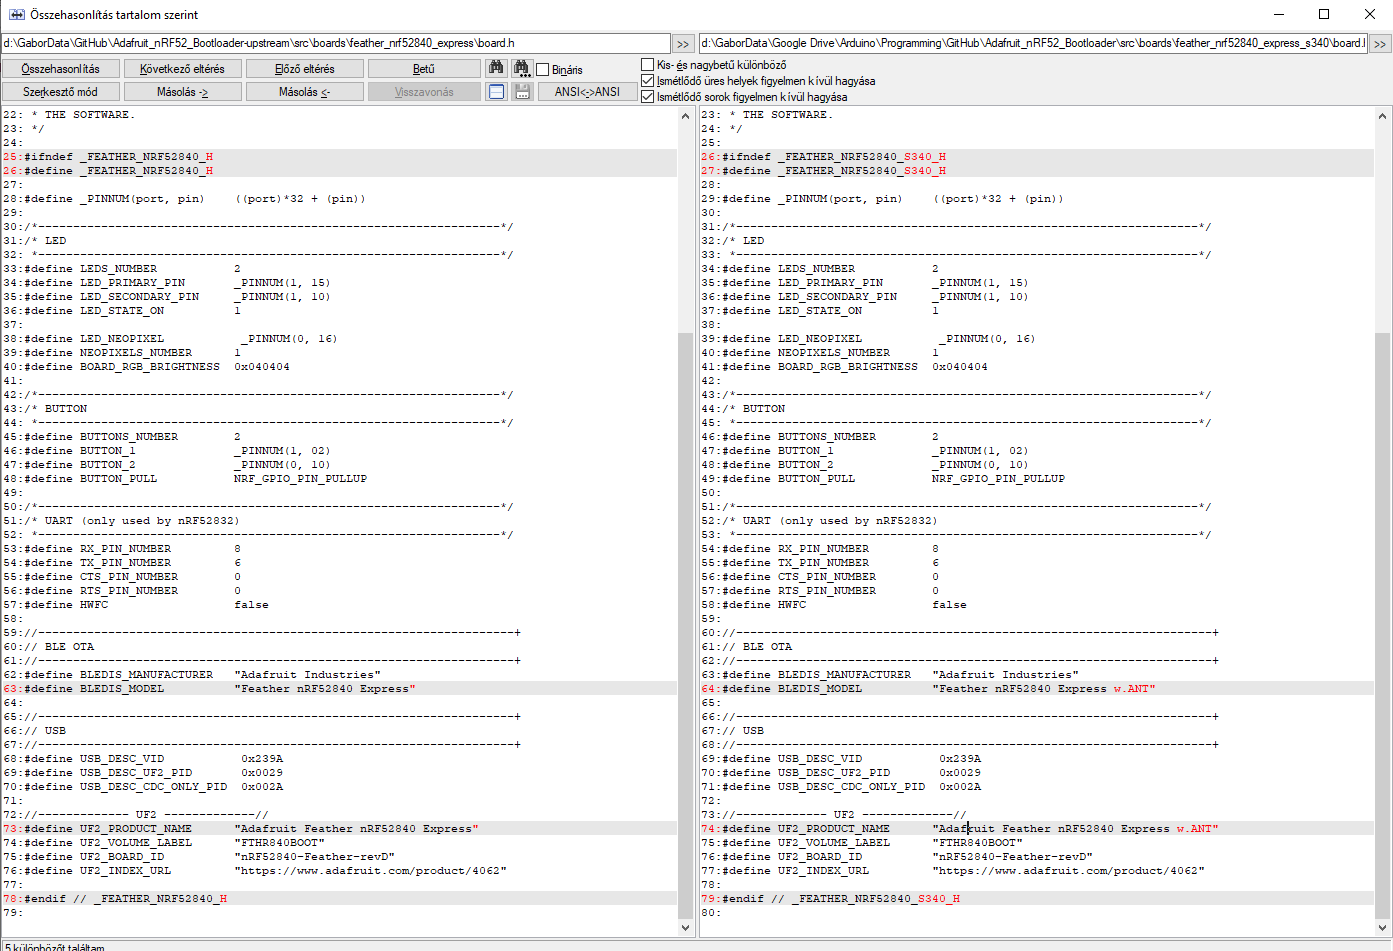
Modify src/boards/feather_nrf52840_express_s340/board.mk
-
Add “USE_S340 = true” to the end of the file as a new line
The graphical diff looks like this (left is orginal, right is modified) 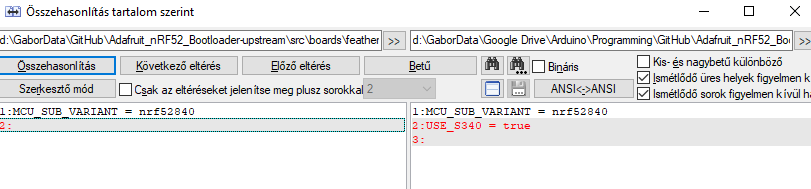
5. Modify the linker script of the UF2 bootloader
Go to …/src/usb/uf2. Modify the “USER_FLASH_START” definition inside uf2cfg.h:
-
In case of the original S140 the flash area shall start at 0x26000
-
In case of the S340 the flash area shall start at 0x31000
That is, the “USER_FLASH_START” shall be defined as follows:
#ifdef S340
#define USER_FLASH_START   0x31000
#else // #ifdef S340
#define USER_FLASH_START   0x26000
#endif // #ifdef S340
The graphical diff looks like this (left is orginal, right is modified) 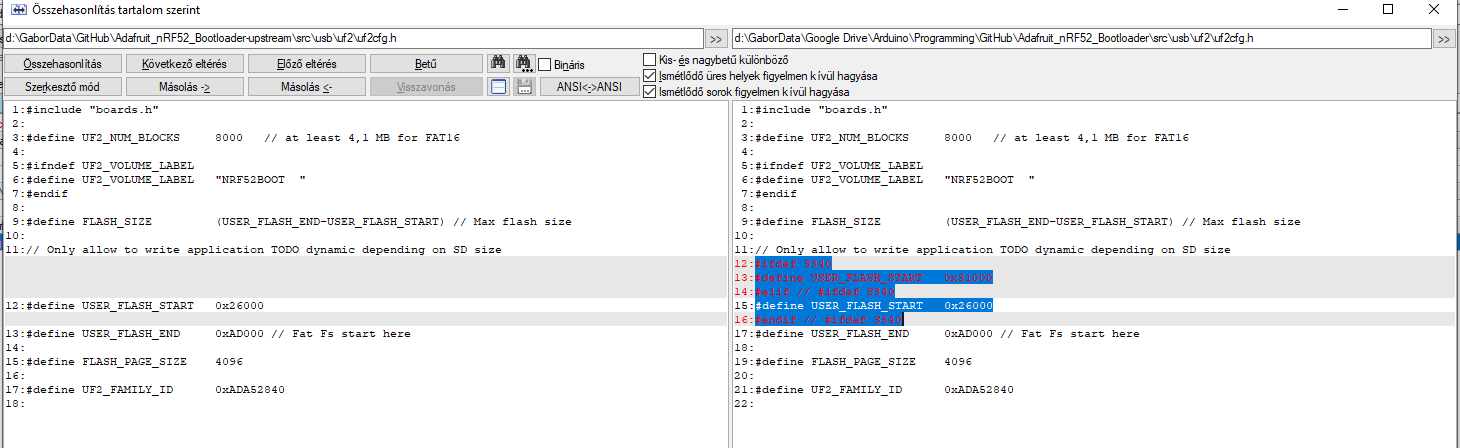
6. Create a new GCC linker script for the freshly defined board
-
Go to …/src/linker directory.
-
Copy the S140 linker script as S340 linker, as follows
src/linker $ cp nrf52840_s140_v6.ld nrf52840_s340_v6.ld
7. Adapt the main.c program
-
Go to …/src/
-
Adapt …/src/main.c to supply the ANT_LICENSE_KEY for the softdevice enable in case of S340, otherwise call the function without the key, as follows:
#ifndef ANT_LICENSE_KEY
APP_ERROR_CHECK( sd_softdevice_enable(&clock_cfg, app_error_fault_handler) );
#else
APP_ERROR_CHECK( sd_softdevice_enable(&clock_cfg, app_error_fault_handler, ANT_LICENSE_KEY) );
#endif
The graphical diff looks like this (left is orginal, right is modified) 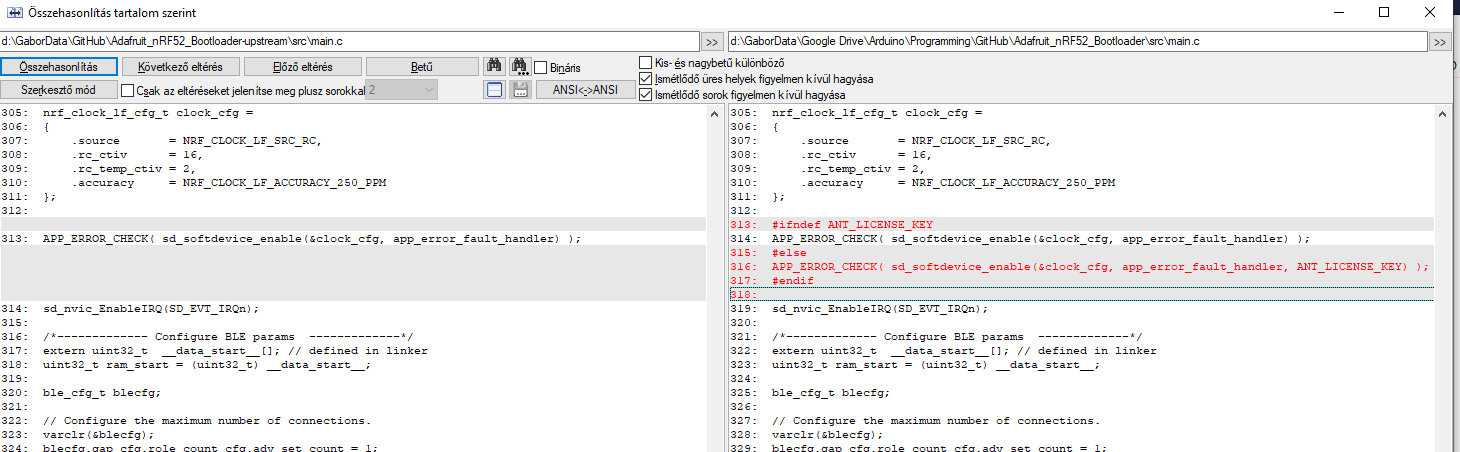
D. Build and flash the modified Adafruit bootloader
Go to the root of the bootloader directory tree. Build and flash as follows.
NOTE: adapt the GNU_INSTALL_ROOT and SERIAL definitions according to your local setup!
make GNU_INSTALL_ROOT="C:/Program Files (x86)/GNU Tools Arm Embedded/9 2019-q4-major/bin/"  BOARD=feather_nrf52840_express_s340 all combinehex
make GNU_INSTALL_ROOT="C:/Program Files (x86)/GNU Tools Arm Embedded/9 2019-q4-major/bin/"  BOARD=feather_nrf52840_express_s340 SERIAL=COM5 dfu-flash
Enjoy 🙂
If you got confused you can check my forked repo at: https://github.com/orrmany/Adafruit_nRF52_Bootloader/tree/s340-for-nrf52840-Feather
E. Appendix: a transcript of my build
C:\Users\egbozie\Google Drive\Arduino\libraries\Adafruit_nRF52_Bootloader>make BOARD=feather_nrf52840_express all combinehex
CC main.c
CC boards.c
CC flash_nrf5x.c
CC dfu_ble_svc.c
CC dfu_init.c
CC nrfx_power.c
CC nrfx_nvmc.c
CC system_nrf52840.c
CC bootloader.c
CC bootloader_settings.c
CC bootloader_util.c
CC dfu_transport_serial.c
CC dfu_transport_ble.c
CC dfu_single_bank.c
CC pstorage_raw.c
CC ble_dfu.c
CC ble_dis.c
CC app_timer.c
CC app_scheduler.c
CC app_error.c
CC app_util_platform.c
CC crc16.c
CC hci_mem_pool.c
CC hci_slip.c
CC hci_transport.c
CC nrf_assert.c
CC usb_desc.c
CC usb.c
CC msc_uf2.c
CC ghostfat.c
CC dcd_nrf5x.c
CC tusb_fifo.c
CC usbd.c
CC usbd_control.c
CC cdc_device.c
CC msc_device.c
CC tusb.c
AS gcc_startup_nrf52840.S
LD feather_nrf52840_express_bootloader-0.2.13-21-g454b281-dirty-nosd.out
''
   text    data     bss     dec     hex filename
  30376     212   22426   53014    cf16 _build-feather_nrf52840_express/feather_nrf52840_express_bootloader-0.2.13-21-g454b281-dirty-nosd.out
''
CR feather_nrf52840_express_bootloader-0.2.13-21-g454b281-dirty-nosd.hex
CR feather_nrf52840_express_bootloader-0.2.13-21-g454b281-dirty_s340_6.1.1.hex

C:\Users\egbozie\Google Drive\Arduino\libraries\Adafruit_nRF52_Bootloader>make BOARD=feather_nrf52840_express SERIAL=COM5 dfu-flash
LD feather_nrf52840_express_bootloader-0.2.13-21-g454b281-dirty-nosd.out
CR feather_nrf52840_express_bootloader-0.2.13-21-g454b281-dirty-nosd.hex
Zip created at _build-feather_nrf52840_express/feather_nrf52840_express_bootloader-0.2.13-21-g454b281-dirty_s340_6.1.1.zip
adafruit-nrfutil --verbose dfu serial --package _build-feather_nrf52840_express/feather_nrf52840_express_bootloader-0.2.13-21-g454b281-dirty_s340_6.1.1.zip -p COM5 -b 115200 --singlebank --touch 1200
Upgrading target on COM5 with DFU package C:\Users\egbozie\Google Drive\Arduino\libraries\Adafruit_nRF52_Bootloader\_build-feather_nrf52840_express\feather_nrf52840_express_bootloader-0.2.13-21-g454b281-dirty_s340_6.1.1.zip. Flow control is disabled, Single bank, Touch 1200
Touched serial port COM5
Opened serial port COM5
Starting DFU upgrade of type 3, SoftDevice size: 190272, bootloader size: 30580, application size: 0
Sending DFU start packet
Sending DFU init packet
Sending firmware file
########################################
########################################
########################################
########################################
########################################
########################################
########################################
########################################
########################################
########################################
################################
Activating new firmware

DFU upgrade took 24.582117557525635s
Device programmed.

C:\Users\egbozie\Google Drive\Arduino\libraries\Adafruit_nRF52_Bootloader>


Visszajelzés: PlatformIO IDE integration for the nRF52840 Feather Express with S340 | Blogarak
Would this work with a Adafruit ItsyBitsy nRF52840 Express?
I think it should.
Note, that due to SW-releases hapenned since then this adaption might not work anymore out-of-the-box. You probably need to update here-and-there
I managed to build the modified Bootloader (v0.5.0) with some changes needed for the newer version. Though I am not sure if the softdevice is working correcty, because after modifiying the adafruit board definition for Arduino IDE with s340 (strictly following your other post). I am able to upload different ant examples (your SDAntplus implementation, the antplus-arduino library in combination with NativeAnt) but neither of those seems to be working. I want to send ant+ pwr data to my garmin watch. There is also an example called “DeviceSearch” which should look for any kind of ant Monitor that sends data, but i am not able to find my watch in heart rate broadcasting mode nor my heart rate monitor. Am I doing something wrong? How can I test the function of the softdevice without a dev kit from nordic semi? I also have a segger J-Link for flashing the firmware directly. In case of breaking the feather.
Kind regards!
I am not sure if I fully understood your question. I hope that you are aware, that the SDAntplus library is not ANT+ application, only a a library to handle the ANT-radio with the help of the binary radio-firmware (the S340 SoftDevice). You *must* explicitly program some ANT+ server-application before you can observe *any* ANT radio transmission from the device.
An analogy: if you want to create a video-streaming server on your PC to send data to video-browsing clients, then you need to install first a device-driver for your Network Interface Card (NIC), this more-or-less corresponds to the concept of a NordicSemi SoftDevice. Then you would need to install the TCP/IP communication library (“protocol”) on top of the NIC-driver, this latter corresponds my SDAntplus library. However, this are just necessary, but insufficient preconditions for creating the streaming-server. You would need to first create/install a streaming-server application in order to be *able/ to start to stream something, but then you would be still without videocontent!
In your case you would need first get/implement the static part (the syntax- and grammar-rules of the PWR profile) in order to be able to encode/decode/send/receive PWR sensor ANT+ Profile messages. My library currently lacks support for the PWR profile and as I do not have a PWR sensor I do not plan to implement that myself either. The antplus-arduino library might have that, check with Cujo.
After the static protocol rules for the PWR profile you must also take care of the dynamic rules of the PWR profile: you must implement the control-logic (the periodic-state machine) of the ANT+ PWR protocol profile: you must follow the dynamic timing rules of the protocol: when to transmit what messages with what periodicity in order to make your gadget recognizable as a PWR sensor (i.e., ANT+ server).
After these you can start to implement your “real” SW-application: the code that actually create the actual PWR sensor-data you want to broadcast over the ANT+ PWR channel.
(My application on top of SDAntplus was * not* to send sensor data (albeit that should be okay), but rather to *collect* sensor data, hence I do not have any code demonstrating *sending* sensor data that I could share with you )
First, thanks for your detailed answer!
I know that I have to implement the PWR profile by myself in order to send the data to my watch later. Before working on that I want to know that the modified bootloader with the softdevice is working. It doesn’t neccessarily have to be a monitor that sends any kind of data to my watch yet, I would already be happy if I was able to collect data of my heart rate monitor (the red Garmin one) on the feather, just to know the softdevice is working. Like outputting the current Heart Rate to the Serial interface for example. As I understood, this should be possible with the examples from Cujos arduino-antplus (The HeartRateMonitor example) or yours (Sensor_plus_bleuart)?
The newer Bootloader for the feather has a newer linker script that always throws an error that there is not enough flash for the example mentioned. When I change the Linker to the one that comes with the bsp from adafruit and just change the flash origin to 0x31000 for the ant SD it is able to dfu-flash the feather and I also know that ble is working. (The neopixel example with control via the android app) But does working ble neccessarily mean that ant/antplus is also working?
Before trying to get the PWR-Profile to work, I would like to practice with your/cujos implemented Heart Rate profiles. When I upload your SDantplus/Sensor_plus_bleuart sketch, I get these repeating messages:
Channel #0 for HRM: event 0x01 = EVENT_RX_SEARCH_TIMEOUT
(ANT stack generated event when rx searching state for the channel has timed out)
Channel #0 for HRM: event 0x07 = EVENT_CHANNEL_CLOSED
Channel #0 closed for HRM
Reopening…success!
I think the Softdevice/Ant-Stack keeps outputting Time out messages after waiting for a device to connect to it and then it closes the channel and reopens and tries to connect again, as it should, I guess. What do I have to do to collect the data of the HeartRateMonitor/ or connect to it? I also looked in your Code of the ArduinoSportsTracker you wrote, but I couldn’t find any Ant-specific changes compared to the code of the Sensor_plus_bleuart example.
Thanks in Advance!
Best Regards!
Did you make sure that the HRM sensor actually transmits data? (instead of sleeping idly)
Yes, I receive the Heart Rate Data of the HR Belt on my Watch directly and I can also broadcast the HR measurement of the watch. (Wrist HR of Forerunner 935 in case that is important) I have a concept2 PM5 Erg and it can connect to both of those and read heart rate from both of those.
Thank you for this write up. I’ve followed the steps and with some modifications, I seem to have gotten it to work. I have a few questions and concerns I would like to figure out before trying to flash the boot loader to my board.
1. There was no nrf52840_s140_v6.ld in the linker directory. I found this one ./lib/tinyusb/hw/bsp/nrf/boards/feather_nrf52840_express/nrf52840_s140_v6.ld to copy to ./linker/nrf52840_s340_v6.ld. Will that work?
2. You instructions have me change USER_FLASH_START from 0x26000 to 0x31000 in uf2cfg.h. I noticed that nrf52840_s140_v6.ld sets ORIGIN = 0x26000. Do I need to also change ORIGIN to 0x31000 in nrf52840_s340_v6.ld?
3. You build command is:
make make BOARD=feather_nrf52840_express all
Should it not be?
make BOARD=feather_nrf52840_express_s340 all
If I use the first command, it builds using s140. The second builds with s340
4. There is no combinehex target in the make file. Has this maybe changed and been elimitated?
Thank you for your help. I just want to make sure I built things correctly before I flash anything. I think I mostly want to figure out question 2.
Sorry @Jonathan, I was away from this blog for a very long time. I haven’t done nRF52 programming for a very long time and I know that the nRF52 SDK has undergone a major restructuring. I guess this tutorial would need some update, but I do not have the time nowdays.